Understanding the "mount" command
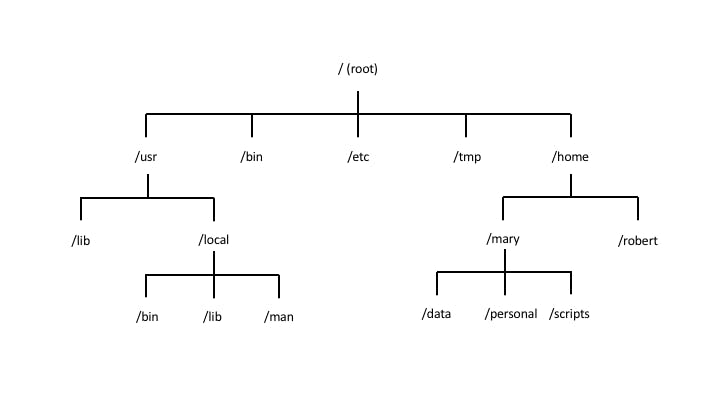
On Linux systems, the structure of the filesystem is hierarchical, much like an upside-down tree. The root (/) directory lies at the base of the filesystem and all other directories are spread from there.


To make the contents of a filesystem that is on another partition or disk (e.g. a USB) accessible to the operating system and its users, you need to mount it. i.e. logically attach it to an existing directory of the unique filesystem. That directory is called the mount point and the contents of the mounted filesystem then appear as if they were located in the mount point directory.
Mounting a filesystem allows users to access its files and directories, and enables the operating system to read and write data to the filesystem. It also enables different types of storage devices to be used with the operating system, such as USB drives, external hard drives, and network file shares.
The image below shows the default partition that is mounted on the root directory. "ext4" is the default filesystem type for most modern Linux distributions

Mounting a New Filesystem
On Ubuntu, when external storage (e.g. USB) is attached, it will be automatically mounted in /media/<username>/<name-of-the-storage> which is /media/jubril/563A-0374 in this example. In Linux, a storage device is logically represented as a special char device in /dev/.
In this example, the USB storage is /dev/sdb (a char device file that represents the USB stick).
We can use the "mount" command to see the USB stick mounted on /media.

We can also use the "lsblk" command to list all block devices. Having the name of the device file, we can mount it in any directory that already exists.

Note: only root can mount partitions using the "mount" command. I'll be temporarily becoming root using the "sudo su" command

Create a new directory on the Desktop or your location of choice. This will serve as the mount point
mkdir /home/jubril/Desktop/usbRun the mount command.
mount /dev/sdb /home/jubril/Desktop/usb
the "mount" command
/dev/sdb - the name of the device file
/home/jubril/Desktop/usb - the mount point
Note that you can mount the same physical device in different places. In this example, the USB stick is mounted on both /media/jubril/563A-0374 and /home/jubril/Desktop/usb as shown in the diagram below

it has been mounted on two different directories.
To Unmount a disk or a partition, run the "umount" command. To be run as root.
sudo umount /home/jubril/Desktop/usb
You can unmount partitions only if they are not used. Therefore, close any open files or directories on that partition.
Understanding the "dd" command
"dd" is a Linux command line utility whose purpose is to copy and convert data between files, disks, and partitions.
Compared to the "cp" command which is used to copy regular files and directories, the "dd" command can be used to read and write from special device files. Note that hard disks in Linux are represented as special device files e.g. /dev/sda3.
It can be used for a wide range of tasks, such as backing up the boot sector of a hard drive, cloning a disk/partition to another one, creating a bootable USB stick etc. Other uses of "dd" include:
Disk imaging: You can use "dd" to create an exact copy of a disk or partition, including all its data, file system, and boot records. This can be useful for creating backups, cloning systems, or transferring data between systems.
Disk wiping: "dd" can be used to securely wipe the contents of a disk or partition, making it more difficult or impossible to recover any data that was stored on it.
Benchmarking: "dd" can be used to test the performance of a storage device or file system by measuring read and write speeds, latency, and other metrics.
Rescue and recovery: "dd" can be used to recover data from damaged or corrupted disks or partitions, by copying data from a damaged device to a healthy one.
Creating a backup image of a USB drive
We'll be cloning the entire content of the USB stick in /dev/sdb and saving it in a file in the home directory called backup-usb.img.
Commands must be run as root, so I'm temporarily becoming root by running the "sudo su" command
dd if=/dev/sdb of=/home/jubril/backup-usb.img status=progress

if = input file
of = output file
status=progress - shows the cloning progress in real-time.
The "dd" command works with blocks, hence, it is cloning the device by copying everything (both empty and occupied space) from the input file. This means that if you have a partition of 10GB and 9GB is free, the "dd" command will copy 10GB to the destination. This is one of the main differences from the "cp" command which will only copy the 1GB occupied space.
With "dd" command, you can clone the entire hard disk or just a partition. The destination partition should be at least the same size as the source partition.
Wiping a disk
dd if=/dev/urandom of=/dev/sdb bs=1M
The command will write random data from the source file "/dev/urandom" to the destination file "/dev/sdb". This will overwrite the contents of the device "/dev/sdb" with random data generated by the Linux kernel's cryptographic random number generator, which is exposed through the special file "/dev/urandom".
bs=1M sets the block size to 1 megabyte (1M), which means that data will be written in chunks of 1MB at a time. This can improve performance compared to writing data one byte at a time, especially when writing to slow devices or over a slow network
This command should be used with caution as it will completely erase any existing data on the target device, and the data written will be effectively impossible to recover. Therefore, make sure you have backed up any important data on the target device before executing this command.
Voila! QED!